Tag Archive | brads

Happy Birthday

Hi Everyone

Wow, we are having a beautiful day today. The temperature says it’s 62 degrees outside but it feels like it’s in the 70’s. Sunshine, no wind. It’s great.


Stampin’ Up has one awesome special coming up . Starting Tuesday, October 22 at 11:00 AM (MT): 25 Stamp Sets on Sale: It’s Stampin’ Up!’s 25th anniversary and we have another celebration in store! 25 stamp sets for 25% off-for one week only! This is a special you don’t want to miss. Be sure to email me for any stamp sets that are on sale that you would like:

cynthia.hawkins999@gmail.com

Today’s card is from Mary’s Stamping Happening:

Colorful Saturday Challenge October 12, 2013

All you stampers out there, should check out her site and play along with me. Mary really makes some great cards.

Ok, here’s my card:

Watermark Landscape-001

Stampin’ Up Products Used

Card Stock: Smoky Slate; Summer Starfruit; Rose Red

Ink: Smoky Slate; Summer Starfruit; Rose Red

Stamp Sets: Label Love; Secret Garden

Ribbon: 3/8″ Satin Stitched Summer Starfruit

Embossing: Stylish Stripes

Framelits: Secret Garden

Punches: Artesian Label; Scallop Edge; Itty Bitty Shapes Trio

Embellishments: Silver Mini Brads

Tools: Trimmer; Big Shot; Dimensionals; Tombow; Snail

Label Love     Secret Garden Stamps

Well……   That’s it for today and I hope you enjoyed my post. Please leave me a comment and let me know what you think about my post. If there is anything you need or want just email me at: cynthia.hawkins999@gmail.com

Thank you for visiting. See you soon.

Blog Signature-001

You’re Too Kind

Hi Everyone

I have been sooo busy today that I have accomplished nothing. Have you had days like that? I did manage to make one (1) – yes that’s right one card today. I know I liked it the last couple days when I had several cards to post. 🙂 Well this card is for two (2) challenges:

The Paper Craft Crew

Paper Craft Crew Card Sketch 55

And Mary’s Colorful Saturday Challenge August 24, 2013

Drum roll – Drum roll

Dum Dum Dum Dum

My Card

Watermark Landscape-001

Stampin’ Up Products Used

Card Stock: Crumb Cake; Whisper White; Coastal Cabana

Ink: Real Red; Cherry Cobbler; Coastal Cabana

Stamp Sets: Too Kind; Gorgeous Grunge

Ribbon: 3/8″ Ruffle Stretch

Punches: Artesian Label; 1 3/8″ Square

Embellishments: Candy Dots

Tools: Trimmer; Dimensionals; Tombow; Snail

Too Kind     Gorgeous Grunge

Well……  That’s it for today. Please leave me a comment and let me know what you think about my card. If there is anything you need or want just email me at: cynthia.hawkins999@gmail.com

Thank you for visiting. See you soon.

Blog Signature-001

Five Cards Today

Hi Everyone

Yeppers, you read it right. I have five (5) cards for you today. Would you believe I made all these cards today. ……Sweet!!!!!!! Those migraines I had last week really put me behind. I am trying to get a system where I do certain challenges on the same day each week. So far, I’m not having any luck. hahaha Good for you guys – since you get to see not one – not two – not three – but five yes five cards today.

Woo Hoo …… Big Big Drum Roll……..dum dum dum dum dum dum  hahaha

This card is for Sketch Frenzy, Firday SFF081613

My Card

friend to friend

Stampin’ Up Products Used

Card Stock: Very Vanilla; Basic Black

Ink: Basic Black

Stamp Sets: Serene Silhouettes; Teeny Tiny Wishes

Tools: Trimmer; Snail

Serene Silhouettes    Teeny Tiny Wishes

This card is for Dynamic Duos  #66

and CAS(E) this Sketch  #41

My Card

Thank You

Stampin’ Up Products Used

Card Stock: Whisper White

Ink: Pool Party; Basic Black

Stamp Sets: Backyard Basics; Lots of Thanks

Tools: Trimmer; Dimensionals

Backyard Basics     Lots of Thanks

This card is for Mary’s Colorful Saturday Challenge

My Card

Best Friend

Stampin’ Up Products Used

Card Stock: Very Vanilla; Soft Suede

Ink: Strawberry Slush; Old Olive; Soft Suede

Stamp Sets: Label Love; Everything Eleanor; Lovely Little Labels

Tools: Trimmer; Stamp-a-ma-jig; Snail

Label Love     everythingeleanor1     Lovely Little Labels

When I did Mary’s card I wanted to do two (2) challenges on one card. I thought I did really good – until I went to put the card together. The card has three (3) layers on it and the other challenge is for The Paper Players #159. As you can see it is a one layer card. So then I needed to come up with something else.

Here’s what I came up with….

Happy Thanksgiving

Stampin’ Up Products Used

Card Stock: Very Vanilla

Ink: Crushed Curry; Pumpkin Pie; Old Olive; Cherry Cobbler;  Cajun Craze; Soft Suede

Tools: Trimmer

This card is for the Red Hot Stampers Challenge #102

My Card

Hello

Stampin’ Up Product Used

Card Stock: Whisper White; Pumpkin Pie; Basic Black

Designer Series Paper: Quatrefancy

Ink: Pumpkin Pie

Stamp Sets: MDS – My Friend

Ribbon: 3/4″ Chevron Black

Embossing: Modern Mosiac Embossing Folder

Punches: Boho Blossoms; Itty Bitty Shapes; Mosiac

Embellishments: Candy Dots

Tools: Trimmer; Sponge; Dimensionals; Tombow; Snail; Brayer

Well……  That’s it for today. Please leave me a comment and let me know what you think about my card. If there is anything you need or want just email me at: cynthia.hawkins999@gmail.com

Thank you for visiting. Come again soon.

Blog Signature-001

F is for Friend

Hi Everyone

Today’s card is for Freshly Made Sketches. FMS96

I really like the way it turned out. You know, challenges are actually – well a challenge. I had to try a lot of stuff before I found something I likes. I hope you like it too.

NOTICE BULLETIN;

I just tried to upload my card for the challenge and I just missed it. It closed before I got it uploaded. 😦  Oh well, I had fun making it anyways.

F is for Friend

Stampin’ Up Products Used

Card Stock: Marina Mist; Real Red; Whisper White

Designer Series Paper: Polka Dot Parade

Ink: Marina Mist; Real Red; Black StazOn

Stamp Sets: Postage Due; Occasions Alphabet

Ribbon: Baker’s Twine

Embossing: Fancy Fan Embossing Folder

Framelits: Hearts A Flutter

Embellishments: Real Red Candy Dots

Tools: Trimmer; Big Shot; Sponges; Dimensionals; Tombow; Snail

Postage Due      Occasions Alphabet

Email me if you would like any of the products I used in today’s card:     cynthia.hawkins999@gmail.com

So…what do you think of today’s card?  Won’t you let me know in today’s comment? Your comments are important to me…and I do read each and every one of them! And remember, if you ever have a question about the cards I create, or the techniques I use, I am only an email away.

Blog Signature-001

Purse Tutorial

Hi Everyone

I am really sorry about not being on the last few days. There has just been so much going on. If life wasn’t happening – migraines were. Well, anyways, I’m here today.

I have been asked to make a tutorial of the purse I have previously posted. You can see original post here. This is my first tutorial, so I hope you understand it. If you have any questions or need clarification on anything – please leave a post or email me: cynthia.hawkins999@gmail.com.


Purse Tutorial Pictures-001

The purse back is 9″ X 8 1/2″

On one of the 9″ sides – score at 2″ and 3 1/4″

Score at 1 1/4″ on the 3 remaining sides

Don’t pay any attention to the punched circles. I wrote the wrong measurement down, so I just covered it with a circle.

Purse Tutorial Pictures-002

Score and cut where indicated. The purse back will look like this:

Purse Tutorial Pictures-003

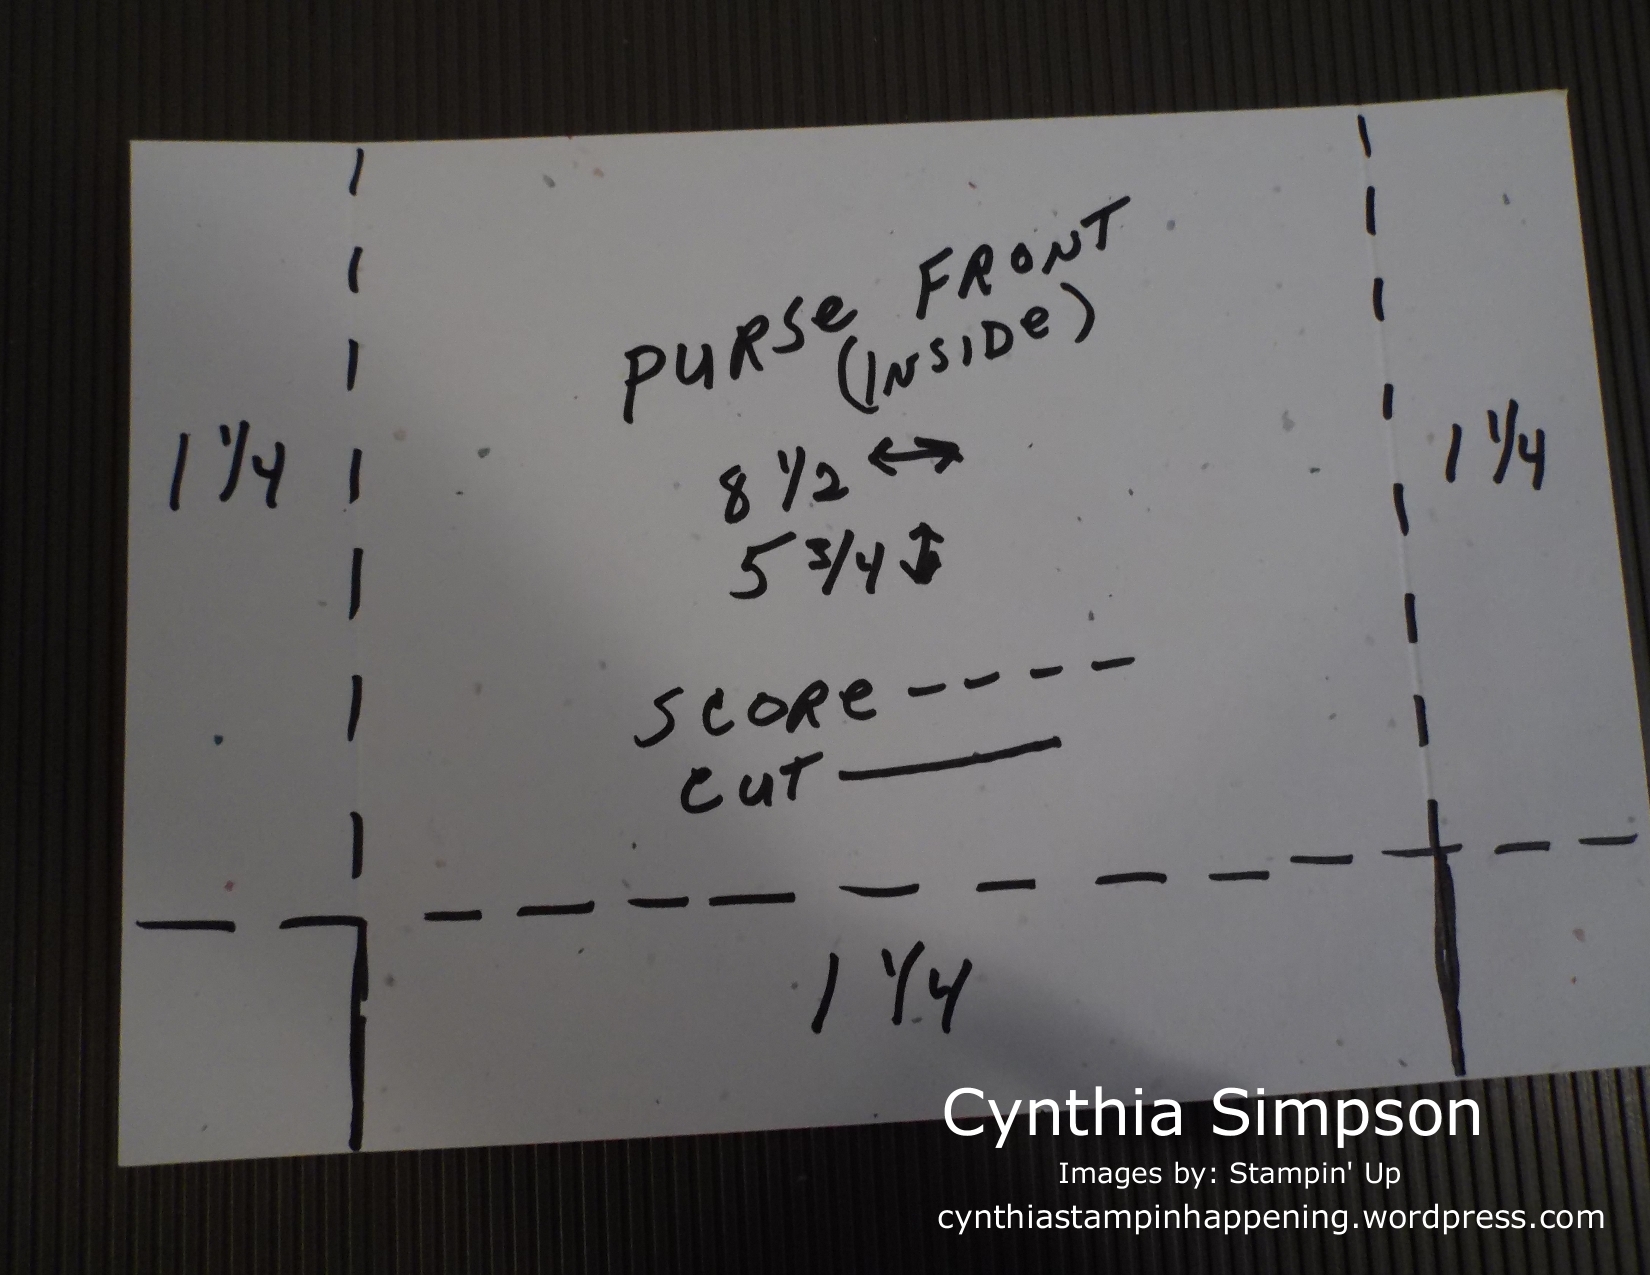
The Purse Front measure 8 1/2″ X 5 3/4″

Score at 1 1/4″ on both 5 3/4″  sides and one 8 1/2″ side

Purse Tutorial Pictures-004

Score and cut where indicated. The purse front will look like this:

Purse Tutorial Pictures-005

You want to go ahead and embellish the front of the purse with any designer series paper and any flat embellishments.

Purse Tutorial Pictures-006

Add sticky strip to the back side of the purse front as shown: I used 1/2″ sticky strip since it was all I had, but 1/4″ will work just as good.

Purse Tutorial Pictures-007

You want to peel the sticky strip off the bottom of the purse and adhere the tabs to the bottom of the purse as shown: I know this picture is upside down, it was the only way I could show you what to do. 🙂

Purse Tutorial Pictures-008

Remove rest of stick strip and attach to purse back. The flaps on the purse back will go inside the purse front so the seams will be on the back side of the purse. It is easier if you attach the bottom of the purse first.

Purse Tutorial Pictures-009

Then attach the sides.

Purse Tutorial Pictures-010

Your purse should look like this:

Purse Tutorial Pictures-011

Next, you want to make the handle. I used about 15-16″ of ribbon. I took the end of the ribbon and folded it over 2 times so there are no edges showing and also to help reinforce it.

Purse Tutorial Pictures-012

You put this on the underside of the purse top and wrap ribbon around outside of top. Make sure the ribbon on inside of purse is lined up with the ribbon on the outside and using your paper piercer – pierce through all layers.

Purse Tutorial Pictures-013

Insert brad through all. Repeat on other side.

Purse Tutorial Pictures-014

If you are going to have a decoration for the closure, you want to make sure it is something that is not going to come off as people will try and pull on it to open the purse. I used a ribbon bow that I wrapped a brad around (instead of tying it) and then pushed the brad through the purse top as shown:

Purse Tutorial Pictures-015

Underside of top showing the brad ends.

Purse Tutorial Pictures-016

I then used velcro closures to hide the brad on the underside.

Purse Tutorial Pictures-017

Purse Tutorial Pictures-018

You now want to add the rest of your embellishments. I didn’t add anymore to this purse except some more washi tape.

Here is a purse I had previously made that I added more embellishments on the outside:

Watermark Landscape-002

You are now finished with your purse. It will hold 6 cards and envelopes depending on how fat your embellishments are. Here is the finished purse and 6 cards:

Purse Tutorial Pictures-019

Purse Tutorial Pictures-020

Purse Tutorial Pictures-021

Purse Tutorial Pictures-022

Purse Tutorial Pictures-023

Purse Tutorial Pictures-024

Watermark Portrait-001

So…what do you think of the tutorial?  Won’t you let me know in today’s comment? Your comments are important to me…and I do read each and every one of them! And remember, if you ever have a question about the cards I create, or the techniques I use, I am only an email away.

Thank you for visiting. See you soon.

Blog Signature-001

You Make Me Smile

Hi Everyone

Today has been busy. Went downtown to the Old Spaghetti Warehouse for a Stampin’ Up meeting with the locals (fellow demonstrators). We got to do some make and takes, a card swap, and eat some scrumptious food. yummy. I had such a good time getting out with everyone. It all ended too soon. Then I had to come home and do my grocery shopping for the next two weeks. Yuck, how fun is that?

Well, on a happy note, today’s card is made out of scraps that I had laying around. It started with the two pinwheels that I had already made up and some butterflies that were punched.  The pool party was embossed with the Stripes Embossing Folder. I then turned the paper and embossed it again making the basket weaving effect, I then sanded the top of the card.  All in all, I think the card turned out good.


Watermark Landscape-001

Stampin’ Up Products Used

Card Stock: Natural White; Pool Party Core’dinations; Old Olive; Crumb Cake

Designer Series Paper: Brights (Old Olive, Real Red, Tempting Turquoise, Pumpkin Pie) Collection; Tea For Two

Ink: Real Red

Stamp Sets: A Round Array

Embossing: Stripes Embossing Floder

Framelits: Apothecary Accents

Punches: 7/8″ Scallop Circle; 1″ Circle; Elegant Butterfly; Bitty Butterfly

Embellishments: Mini Silver Brads; Rhinestone Jewels; This and That Washi Tape

Tools: Trimmer; Big Shot; Sanding Block; Dimensionals; Tombow; Snail

naturalswhite1Pool Party Core'dinations Card Stockold olive papercrumb cake Padbrightsdsp7Tea for Two DSPA Round Arraystripesembossingfolderapothecaryaccenttsframelits17-8 Scallop Circle Punch1inchcircle1elegantbutterflybittybutterflypunchsilverminibradsrhinestonesjewel2this-and-that-designer-washi-tapsStampin' Trimmerbigshotsanding blockDimensionalsTombow Adhesivesnail61

Thank You

Hi Everyone


Did everyone have a good weekend and Mother’s Day. Most of my weekend was spent in bed – ugh – another migraine.  I did have a surprise this weekend. My sister sent me some flowers. That was a very nice surprise. I did manage to get up long enough to make her a gift. I made a card using one of the sneak peek stamp sets and matching embossing folder – Wildflower Meadow. Very pretty card if I say so myself.

Hope you enjoy.


Watermark Portrait-001

Watermark Landscape-001

 I also made her a gift box with 5 cards and matching envelopes. The cards were made using Serene Silhouettes and each one of the Feel Goods sayings. Each card is in a different color. I used the 2013-2014 In colors for the cards.

Watermark Landscape-002

Watermark Landscape-003

Watermark Landscape-004

Watermark Landscape-005

Watermark Landscape-006

Watermark Landscape-007

Thank you for visiting. See you soon.


Blog Signature-001

Purse and Cards

Hi Everyone

Woo Hoo ….. We have some new MDS Downloads.

New “My Digital Studio” Downloads…May 7, 2013

Stampin’ Up! is committed to bringing you fresh, exciting digital content each and every week. Check out the latest downloads below. Click on the download title to see it in the store, or click on the images to get an even closer view. You can also click here to view a PDF with additional details about this week’s downloads. See any you just can’t live without – send me an email:  cynthia.hawkins999@gmail.com

Wonderland Party Ensemble (AU/NZ)

Legit Kit (AU/NZ)

Show & Tell 1 (AU/NZ)

Show & Tell 2 (AU/NZ)


Today I have done a project. I have made a terrific gift. At least it would make a wonderful gift for someone. It is a purse that holds 6 full size cards and envelopes. I have pictures, but unfortunately I did not write down supplies that I used to make them. So today – you get pictures. I hope you enjoy them……   The first picture is of the purse and all the cards and envelopes will fit inside.


Watermark Landscape-001

Watermark Portrait-001

Watermark Portrait-002

Watermark Portrait-003

Watermark Portrait-004

Watermark Portrait-005

Watermark Portrait-006

Thank you for visiting. See you soon.


Kindness Matters

Hi Everyone

Brrr, it sure was cold yesterday. Had to run the heater. My hubby likes it cool, so when he came home from work he opened all the curtains and a few windows. Of course I went behind him and closed them all. There seems to be no in-between for us. If I am comfortable he is sweating and if he is comfortable I am freezing. Figure that one out.

Well on to today’s card. I cased this card from Tami White. This is an absolutely gorgeous card To see her video click here.  The card is just beautiful. Thank you, Tami for sharing this with us. I used a retiring color on my card – Regal Rose. You will probably see a lot of this color used as I am trying to use up my supply before the new colors come out.

Watermark Landscape-001

Stampin’ Up Products Used

Card Stock: Whisper White; Early Espresso; Regal Rose

Designer Series Paper: Brights (Regal Rose)

Stamp Sets: Kindness Matters; Papillon Potpourri

Framelits: Labels Collection

Punches: Elegant Butterfly

Embellishments: Neutral Brads

Tools: Paper Trimmer; Big Shot; Snips; Essential Paper Piercing Pack; Paper Piercer; Sponges; White Gel Pen; Dimensionals; Snail

whisperwhitecardstock4brightscardstock5neutralscardstock4brightsdsp7jetblackstazonregalrosepadkindnessmatters2papillonpotpourrilabelscollectionframelitselegantbutterflybradsneutralsStampin' Trimmerbigshot1snipsEssentials Paper Piercing Packpaperpiercingtoolspongesuni-ballsignogelpen2Dimensionalssnail61

Thank you for visiting. See you soon. Cynthia

Blog Signature-001

Thank You

Hello Everyone:

Yuck, the weatherman finally got it right. It rained yesterday and the temperature dropped down in the 50’s for the high. Brrr. It felt sooo cold after the few warm and nice, warm and nice, warm and nice umm warm and nicedays that we had. Glad I didn’t have to go anywhere in that wet cold rain. 🙂

Today’s card turned out really good. I am really impressed that it turned out so well. The base is Certainly Celery – one of the colors that’s going to be discontinued – and the other main color is Regal Rose – also being discontinued. They look really nice together. I used this silver tape – I don’t remember what it’s called. You get it in the home maintenance section of the store. It’s really shinny – looks like foil but doesn’t crinkle as easily. Actually if you peel the backing off the tape you have to be really careful because it is really sticky. Where you lay it the first time is it – no repositioning it. I didn’t peel the backing off and I just used snail on the back to attach to the card except around the Regal Rose flowers – the silver frame. I peeled the backing off the tape and taped the frame. Even the flowers are made with this tape. I embellished it, punched it, I even stamped the greeting on it, and ran it through the Big Shot with a framelit.

Guess you are wondering what this card and tape looks like. Well here it is……. TA DA………I hope you like it as much as I do.


Watermark Landscape-001

Stampin’ Up Products Used

Card Stock: Certainly Celery; Regal Rose

Designer Series Paper: Brights (Regal Rose)

Stamp Sets: Serene Silhouettes; Itty Bitty Banners

Embossing: Honeycomb Embossing Folder; Clear Embossing Powder

Framelits: Bitty Banner

Punches: Boho Blossoms; Itty Bitty Shapes Trio

Embellishments: Brights Brads (Old Olive)

Tools: Trimmer; Big Shot; Heat Gun; Snips; Dimensionals; Glue Dots;’ Snail

Subtles Card Stockbrightscardstock5brightsdsp7regalrosepad1versamarkpad1jetblackstazonSerene SilhouettesItty Bitty BannershoneycombembossingfolderclearembosspowderBitty Banners Framelitsbohoblossoms3ittybittyshapespunch4Brads Brights CollectionStampin' Trimmerbigshot1Heat Tool snipsDimensionalsminigluedots1snail61

Thank you for visiting. See you soon. Cynthia

Blog Signature-001